1] Sart pc in safe mode [press F8 at the time of bootup]
2] uninstall idm completely
3] reboot in safe mode
4] now open regedit
5] Search for 'internet download manager' and delete all these
6] reinstall idn , all's done.
Read more!
12.8.10
Use mobile java j2me software in your computer with java emulator
Do you want to use mobile applications, games and softwares in your pc? Or do you want to check mobile applications and games before sending it to your mobile from your PC? Then here is a solution for you. Below is given how to use your mobile j2me java softwares from your computer.
You can use software named “Sjboy java emulator” to access mobile java softwares in your computer. (Download link is given at bottom).
This software makes a java j2me software running platform in your PC.
You can use this software to use any type of java software from your pc. Or with this software you can use any mobile software with .jar extension from your PC.( .jad format applications are not supported by this software )
You can use this to play, use and check mobile games, softwares and applications in your PC.
After you download the software and install it every .jar files in your computer will open with “Sjboy java j2me emulator”. When you open .jar files a new window will open which will look like a mobile phone as shown on picture below. There are four such graphic interfaces with phone model from which you can choose they look like Nokia 3100, Nokia N70, Motorola V300 and Sony Ericsson K750, The N70 one is shown in the picture below.
There is even a feature to capture the screen-shot of the game or application while you are using or playing games or softwares in Sjboy emulator.
Right click here and click save target as. Or just click here.
Right click on the link and click “Save Target As..”
Read more!
1.8.10
How to make xp usb bootable
1] Download Komku-SP-usb.exe-
mediafire rapidshare megaupload depositfiles easyshare
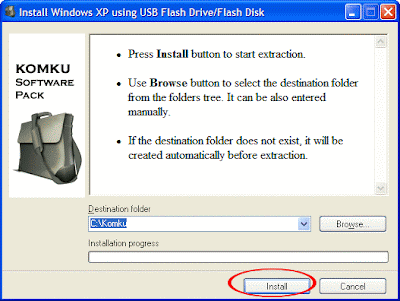
2] Double click Komku-SP-usb.exe
a window will appear... and click Install
3] Insert your USB Flash Drive.
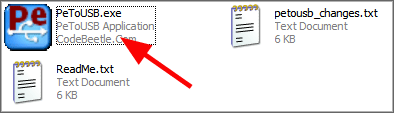
4] Locate folder C:\Komku\PeToUSB\
double click PeToUSB.exe
a window will appear like this...

Destination Drive : select USB Removable
check on Enable Disk Format
check on Quick Format
check on Enable LBA (FAT 16x)
Drive Label : XP-KOMKU (or whatever you want)
then click Start
 Click Yes to continue....
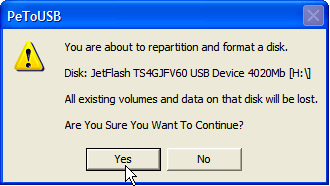
"You are about to repartition and format a disk. Disk: .... All existing volumes and data on that disk will be lost. Are You Sure You Want To Continue?"
click Yes

Wait a few seconds...
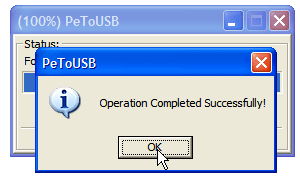
Click OK, and you can close PeToUSB window.
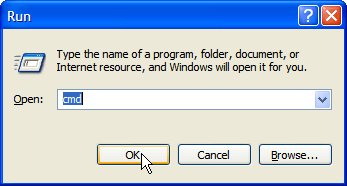
5] Open Command Prompt ...
Click Start > Run > type cmd > click OK
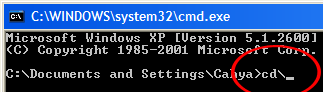
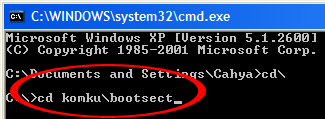
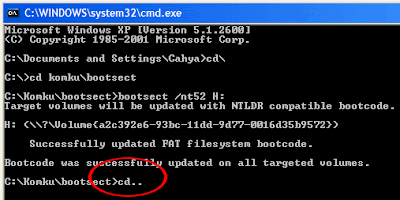
On Command Prompt window, go to directory C:\Komku\bootsect\how to do this?
first type this cd\ and press Enter
then type cd komku\bootsect and press Enter
the result...
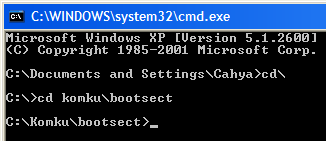
Don't close Command Prompt window, and go to step 6...
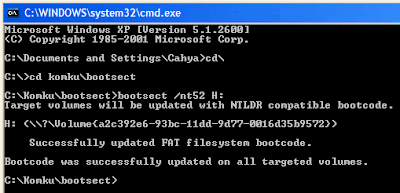
6] on command prompt window, type bootsect /nt52 H:
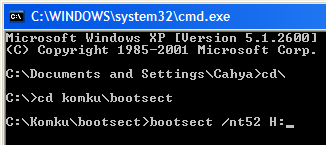
H: is drive letter for my USB Flash Drive, it may be different with yours...
 and press Enter
the result... "Successfully updated filesystem bootcode. Bootcode was succesfully updated on all targeted volumes."
don't close Command Prompt window, and go to step 7...
7] now type this cd.. and press Enter
then type cd usb_prep8 and press Enter
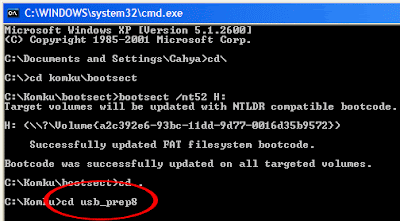
type usb_prep8 again... and pres Enter
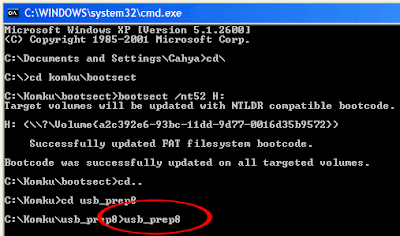
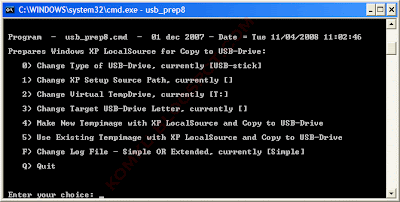
8] Your command prompt window will look like this
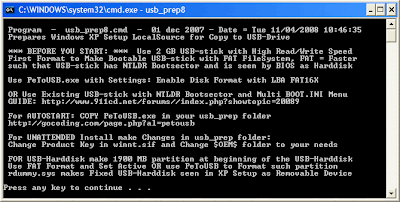
Press any key to continue...
usb_prep8 welcome screen will appear
now, insert your original Windows XP CD, or Windows XP with sata ahci driver to your CD/DVD ROM
and back to Command Prompt window
type 1 then press Enter...
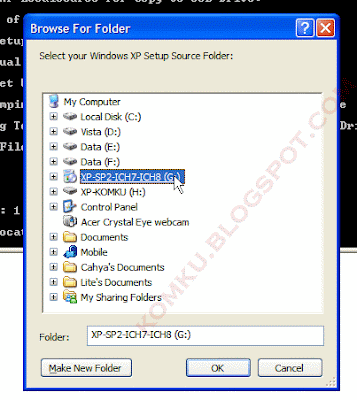
"Browse For Folder" window will appear, select your CD/DVD drive and click OK
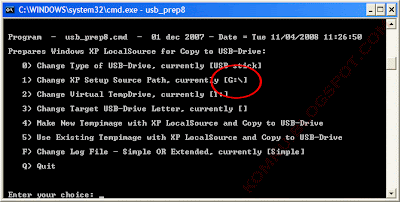
the result... "XP Setup Source Path" changed to G:\ (yours may be different)
now for point 2, if letter T is currently assigned to a drive in your computer, you must change it.... if not, leave it as it is
how to change it?
type 2 and press Enter...
 "Enter Available Virtual DriveLetter"
for example you doesn't have drive Sso you type S and press Enter
back to usb_prep8 welcome screen...
now type 3 and press Enter...
 "Please give Target USB-Drive Letter e.g type U" Enter Target USB-Drive Letter:
because my Flash drive letter is Hso, type H and press Enter...
after back to usb_prep8 welcome screen...
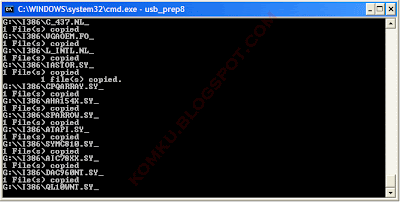
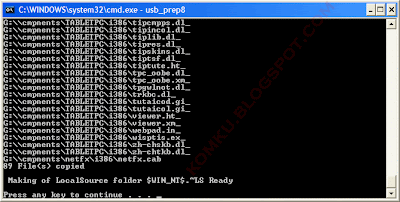
now type 4 and press Enter to make new temporary image with XP LocalSource and copy it to USB Flash Drive
please wait a few seconds..
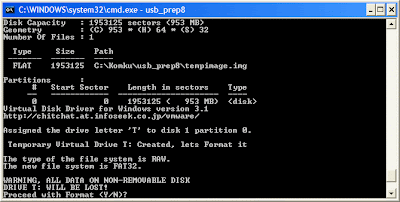
"WARNING, ALL DATA ON NON-REMOVABLE DISK DRIVE T: WILL BE LOST! Proceed with Format (Y/N)?"
type Y and press Enter
please wait....
when format virtual disk complete, press any key to continue...
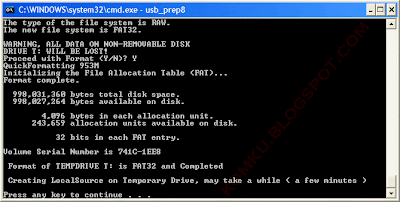
please wait... making of LocalSource folder is in progress...
when "Making of LocalSource folder $WIN_NT$.~LS Ready"
Press any key to continue...
"Copy TempDrive Files to USB-Drive in about 15 minutes = Yes OR STOP = End Program = No"
Click Yes, and wait...
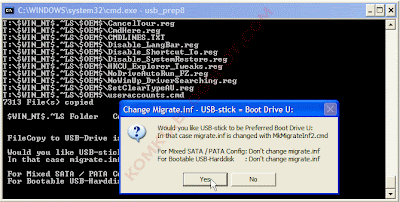
"Would you like USB-stick to be preferred Boot Drive U: bla... bla..."
Click Yes
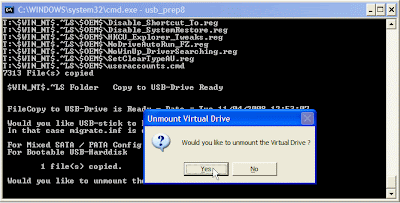
"Would you like to unmount the Virtual Drive ?"
Click Yes, wait a few seconds, and press any key....
press any key again to close usb_prep8...
Now, your USB Flash Drive is ready..
9] Now, insert your USB Flash Drive/Flash Disk/Thumb Drive to your notebook.
go to BIOS and make USB HDD (or USB ZIP in some other machine) as primary boot device....
then boot form your USB Flash Drive....
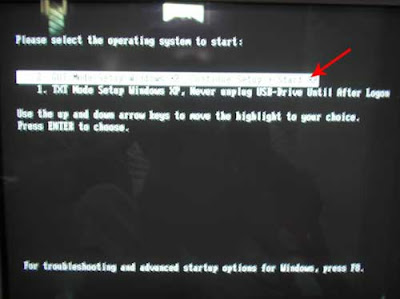
and select "TXT Mode Setup Windows XP, Never unplug USB-Drive Until After Logon"
After Hard Disk detected, delete all partition, create single partition... and install Windows XP on that partition...
and wait...
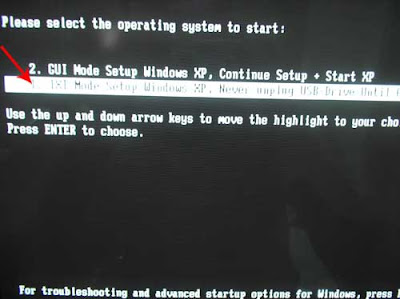
once text mode setup is complete, computer will restart....
this time select "GUI Mode setup Windows XP, Continue Setup + Start XP"
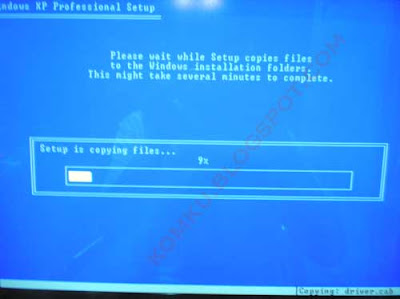
Continue Windows XP setup.... and Done!
Windows XP Installed.... Read more!
mediafire rapidshare megaupload depositfiles easyshare
2] Double click Komku-SP-usb.exe

a window will appear... and click Install

3] Insert your USB Flash Drive.
4] Locate folder C:\Komku\PeToUSB\
double click PeToUSB.exe

a window will appear like this...

Destination Drive : select USB Removable
check on Enable Disk Format
check on Quick Format
check on Enable LBA (FAT 16x)
Drive Label : XP-KOMKU (or whatever you want)
then click Start
 Click Yes to continue....
"You are about to repartition and format a disk. Disk: .... All existing volumes and data on that disk will be lost. Are You Sure You Want To Continue?"
click Yes

Wait a few seconds...

Click OK, and you can close PeToUSB window.
5] Open Command Prompt ...
Click Start > Run > type cmd > click OK

On Command Prompt window, go to directory C:\Komku\bootsect\how to do this?
first type this cd\ and press Enter

then type cd komku\bootsect and press Enter

the result...

Don't close Command Prompt window, and go to step 6...
6] on command prompt window, type bootsect /nt52 H:

H: is drive letter for my USB Flash Drive, it may be different with yours...
 and press Enter
the result... "Successfully updated filesystem bootcode. Bootcode was succesfully updated on all targeted volumes."

don't close Command Prompt window, and go to step 7...
7] now type this cd.. and press Enter

then type cd usb_prep8 and press Enter

type usb_prep8 again... and pres Enter

8] Your command prompt window will look like this

Press any key to continue...
usb_prep8 welcome screen will appear

Prepares Windows XP LocalSource for Copy to USB-Drive:
0) Change Type of USB-Drive, currently [USB-stick]
1) Change XP Setup Source Path, currently []
2) Change Virtual TempDrive, currently [T:]
3) Change Target USB-Drive Letter, currently []
4) Make New Tempimage with XP LocalSource and Copy to USB-Drive
5) Use Existing Tempimage with XP LocalSource and Copy to USB-Drive
F) Change Log File - Simple OR Extended, currently [Simple]
Q) Quit
Enter your choice:_
now, insert your original Windows XP CD, or Windows XP with sata ahci driver to your CD/DVD ROM
and back to Command Prompt window
type 1 then press Enter...
"Browse For Folder" window will appear, select your CD/DVD drive and click OK

the result... "XP Setup Source Path" changed to G:\ (yours may be different)

now for point 2, if letter T is currently assigned to a drive in your computer, you must change it.... if not, leave it as it is
how to change it?
type 2 and press Enter...
 "Enter Available Virtual DriveLetter"
for example you doesn't have drive Sso you type S and press Enter
back to usb_prep8 welcome screen...
now type 3 and press Enter...
 "Please give Target USB-Drive Letter e.g type U" Enter Target USB-Drive Letter:
because my Flash drive letter is H
so, type H and press Enter...after back to usb_prep8 welcome screen...
now type 4 and press Enter to make new temporary image with XP LocalSource and copy it to USB Flash Drive
please wait a few seconds..

"WARNING, ALL DATA ON NON-REMOVABLE DISK DRIVE T: WILL BE LOST! Proceed with Format (Y/N)?"
type Y and press Enter
please wait....
when format virtual disk complete, press any key to continue...

please wait... making of LocalSource folder is in progress...

when "Making of LocalSource folder $WIN_NT$.~LS Ready"
Press any key to continue...

"Copy TempDrive Files to USB-Drive in about 15 minutes = Yes OR STOP = End Program = No"
Click Yes, and wait...

"Would you like USB-stick to be preferred Boot Drive U: bla... bla..."
Click Yes

"Would you like to unmount the Virtual Drive ?"
Click Yes, wait a few seconds, and press any key....
press any key again to close usb_prep8...

Now, your USB Flash Drive is ready..
9] Now, insert your USB Flash Drive/Flash Disk/Thumb Drive to your notebook.
go to BIOS and make USB HDD (or USB ZIP in some other machine) as primary boot device....
then boot form your USB Flash Drive....
and select "TXT Mode Setup Windows XP, Never unplug USB-Drive Until After Logon"

After Hard Disk detected, delete all partition, create single partition... and install Windows XP on that partition...
and wait...

once text mode setup is complete, computer will restart....
this time select "GUI Mode setup Windows XP, Continue Setup + Start XP"

Continue Windows XP setup.... and Done!
Windows XP Installed.... Read more!
How to make vista / windows 7 usb bootable
1] Insert the usb and os bootable cd
2] start cmd prompt
3] type DISKPART and enter
4] type LIST DISK and enter
5] type SELECT DISK 1 and enter {for usb drive}
6] type CLEAN and enter
7] type CREATE PARTITION PRIMARY and enter
8] type SELECT PARTITION 1 and enter
9] type ACTIVE and enter
10] type FORMAT FS=FAT32 and enter
11] type ASSIGN and enter
12] type EXIT and enter
13] type XCOPY E:\*.* /S /E /F G:\ and enter {here E:=dvd drive and G:=usb drive} Read more!
30.5.10
How To Backup System Restore Points
System Restore is only backing up key elements of the operating system like the Windows Registry, user profile or Windows File Protection files.
One of the limitations of System Restore is that old restore points will be deleted automatically based on the available hard drive space for the feature. This means that it is only possible to restore recent system states.
Some users might want to backup an early System Restore point before it gets deleted to be able to restore it at a later time. This can be done by copying a restore folder and saving it into a different location.
Two barriers need to be passed for this to happen. The first is the hidden state of the System Volume Information folder, the second the access rights
The option to hide protected operating system files needs to be disabled so that the System Volume Information folder becomes visible in Windows Explorer. This is done in the folder options. Windows 7 users open Windows Explorer, click on Tools > Folder options to open the configuration menu. The view tab contains the option to hide protected operating system files.

The System Volume Information folder should now be visible in Windows Explorer. It is not possible to access it right away because of the access rights of the folder. The rights can be changed with a right-click on the folder and the selection of properties. This opens a configuration window.
Switch to the Security tab in that folder.

Click the continue button. This opens a new window that lists all users or groups that have access rights. Click the add button in that window.

Enter the user name of the user who should be able to access and work with the folder. Click the check names button to find the username and ok to apply the changes.

It is now possible to access the System Volume Information folder in Windows Explorer. The system restore points use cryptic names. The best way to identify them is to look at the date they were created or modified. Pick the ones that you want to backup. It is advised to copy the System Restore points to a different location.
You can now revert the changes made to the System Restore folder and the folder visibility. If you want to restore a previously backed up System Restore point you need to copy it back into that folder to be able to do so. Read more!
One of the limitations of System Restore is that old restore points will be deleted automatically based on the available hard drive space for the feature. This means that it is only possible to restore recent system states.
Some users might want to backup an early System Restore point before it gets deleted to be able to restore it at a later time. This can be done by copying a restore folder and saving it into a different location.
Two barriers need to be passed for this to happen. The first is the hidden state of the System Volume Information folder, the second the access rights
The option to hide protected operating system files needs to be disabled so that the System Volume Information folder becomes visible in Windows Explorer. This is done in the folder options. Windows 7 users open Windows Explorer, click on Tools > Folder options to open the configuration menu. The view tab contains the option to hide protected operating system files.
The System Volume Information folder should now be visible in Windows Explorer. It is not possible to access it right away because of the access rights of the folder. The rights can be changed with a right-click on the folder and the selection of properties. This opens a configuration window.
Switch to the Security tab in that folder.
Click the continue button. This opens a new window that lists all users or groups that have access rights. Click the add button in that window.
Enter the user name of the user who should be able to access and work with the folder. Click the check names button to find the username and ok to apply the changes.
It is now possible to access the System Volume Information folder in Windows Explorer. The system restore points use cryptic names. The best way to identify them is to look at the date they were created or modified. Pick the ones that you want to backup. It is advised to copy the System Restore points to a different location.
You can now revert the changes made to the System Restore folder and the folder visibility. If you want to restore a previously backed up System Restore point you need to copy it back into that folder to be able to do so. Read more!
18.5.10
Stop Annoying “Restart” Prompt after Windows Updates
Step 1-
Your first step is to open Notepad. (Start > Run > “Notepad” > OK)
In Notepad, just type the command “net stop wuauserv” (no quotes, as in above). Then close the window, and select “Yes” to save changes.
step 2-
What we’re doing is creating an executable batch file which will run a command when double-clicked, to stop the Windows Automatic Updates Service. Make sure that your “Save as type” is set to “All Files” so that you don’t accidently create a text file. Save your file with an extension of “.bat” for example “stop this.bat”
step 3-
When Windows starts nagging you to restart, just double click this to run it and stop the service. You won’t be bothered again. The service will restart when you reboot, which is needed to install the updates in the first place. Read more!
HACK PASSWORD OF ANY OS
Windows-
1. By manualy injecting the cmd.exe inplace of utilman.exe.
a. For this, we need a linux livecd which is able to mount the parttion. We take Backtrack3 livecd.
b. now boot the livecd.
c. Mount the c partition-
->ls dev (it will list all device connecting,from here we get the name of c partiton as sda1 or sda2
->mkdir /mnt/sda1 (it will create the mount device direcotry)
->mount /dev/sda1 /mnt/sda1 (for mounting)
->umount /mnt/sda1 (for unmounting)
d. Go to the windows directory, rename utilman.exe to utilman.old and copy cmd.exe as utilman.exe.
e. Now boot up windows. At the time of login screen, press WIN+U, it will prompt cmd prompt.
f. type this cmd to reset password-
-> netuser [username] [new password]
2. By using Konboot to bypass the password.
3. By using ESR_PRO livecd to reset the password.
Linux-
1. By using konboot -
2. By using command-
2. By using command-
To change the password,
a. turn on the computer and press the ESC key when GRUB appears. Scroll down and highlight ‘Recovery Mode’ and press the ‘B’ key; this will cause you to enter ‘Single User Mode’.
b.You’re now at the prompt, and logged in as ‘root’ by default. Type ‘passwd’ and then choose a new password. This will change the root password to whatever you enter. If you’re interested in only gaining access to a single account on the system, however, then type ‘passwd username’ replacing ‘username’ with the login name for the account you would like to alter the password for.
Mac-
If the Mac runs OS X 10.4, then you only need the installation CD. Insert it into the computer, reboot. When it starts up, select UTILITIES > RESET PASSWORD. Choose a new password and then use that to log in.
If the Mac runs OS X 10.4, then you only need the installation CD. Insert it into the computer, reboot. When it starts up, select UTILITIES > RESET PASSWORD. Choose a new password and then use that to log in.
If the Mac runs OS X 10.5, restart the computer and press COMMAND + S. When at the prompt, type:
fsck -fy
mount -uw /
launchctl load /System/Library/LaunchDaemons/com.apple.DirectoryServices.plist
dscl . -passwd /Users/UserName newpassword
Read more!
SECRET GODMODE IN WINDOWS 7
It is basically a control panel of sorts which provides you access to all the features in one explorer window. In the Windows 7 control panel, features are grouped together either in categories or control panel item names. Nothing is grouped under anything in GodMode.
How to access GodMode?
Method 1:
1. Create a new folder and name it GodMode.{ED7BA470-8E54-465E-825C-99712043E01C}
2. The icon will be changed automatically to Control Panel’s icon.
3. Now open the folder and see the magic of Windows Registry!
Method 2
1. Create a shortcut with following path and set desired icon:
explorer.exe shell:::{ED7BA470-8E54-465E-825C-99712043E01C}
Note: Sometimes it kills explorer.exe using Method 1! probably Windows Vista x64 editions. Therefore I suggest to use Method 2.
Solution for the Crash
To get rid of this issue, Boot into Safe Mode with Command Prompt and delete that folder. For eg. You created a folder GodMode.{ED7BA470-8E54-465E-825C-99712043E01C} on desktop, So either navigate to Desktop folder execute the following command:
RmDir “GodMode.{ED7BA470-8E54-465E-825C-99712043E01C}”
Or type the absolute path of folder, like-
RmDir “C:\Users\\Desktop\GodMode.{ED7BA470-8E54-465E-825C-99712043E01C}”
Applies To:
* Windows Vista x86 editions
* Windows Vista x64 editions
* Windows 7 x86 editions
* Windows 7 x64 editions
Windows has lot of GodModes.
For example, the first one could be a folder named “Hungry Hacker.{00C6D95F-329C-409a-81D7-C46C66EA7F33}” (use everything inside quotes–but not the quotes themselves).
Here’s the list of strings:
{00C6D95F-329C-409a-81D7-C46C66EA7F33}
{0142e4d0-fb7a-11dc-ba4a-000ffe7ab428}
{025A5937-A6BE-4686-A844-36FE4BEC8B6D}
{05d7b0f4-2121-4eff-bf6b-ed3f69b894d9}
{1206F5F1-0569-412C-8FEC-3204630DFB70}
{15eae92e-f17a-4431-9f28-805e482dafd4}
{17cd9488-1228-4b2f-88ce-4298e93e0966}
{1D2680C9-0E2A-469d-B787-065558BC7D43}
{1FA9085F-25A2-489B-85D4-86326EEDCD87}
{208D2C60-3AEA-1069-A2D7-08002B30309D}
{20D04FE0-3AEA-1069-A2D8-08002B30309D}
{2227A280-3AEA-1069-A2DE-08002B30309D}
{241D7C96-F8BF-4F85-B01F-E2B043341A4B}
{4026492F-2F69-46B8-B9BF-5654FC07E423}
{62D8ED13-C9D0-4CE8-A914-47DD628FB1B0}
{78F3955E-3B90-4184-BD14-5397C15F1EFC}
Read more!
How to access GodMode?
Method 1:
1. Create a new folder and name it GodMode.{ED7BA470-8E54-465E-825C-99712043E01C}
2. The icon will be changed automatically to Control Panel’s icon.
3. Now open the folder and see the magic of Windows Registry!
Method 2
1. Create a shortcut with following path and set desired icon:
explorer.exe shell:::{ED7BA470-8E54-465E-825C-99712043E01C}
Note: Sometimes it kills explorer.exe using Method 1! probably Windows Vista x64 editions. Therefore I suggest to use Method 2.
Solution for the Crash
To get rid of this issue, Boot into Safe Mode with Command Prompt and delete that folder. For eg. You created a folder GodMode.{ED7BA470-8E54-465E-825C-99712043E01C} on desktop, So either navigate to Desktop folder execute the following command:
RmDir “GodMode.{ED7BA470-8E54-465E-825C-99712043E01C}”
Or type the absolute path of folder, like-
RmDir “C:\Users\
Applies To:
* Windows Vista x86 editions
* Windows Vista x64 editions
* Windows 7 x86 editions
* Windows 7 x64 editions
Windows has lot of GodModes.
For example, the first one could be a folder named “Hungry Hacker.{00C6D95F-329C-409a-81D7-C46C66EA7F33}” (use everything inside quotes–but not the quotes themselves).
Here’s the list of strings:
{00C6D95F-329C-409a-81D7-C46C66EA7F33}
{0142e4d0-fb7a-11dc-ba4a-000ffe7ab428}
{025A5937-A6BE-4686-A844-36FE4BEC8B6D}
{05d7b0f4-2121-4eff-bf6b-ed3f69b894d9}
{1206F5F1-0569-412C-8FEC-3204630DFB70}
{15eae92e-f17a-4431-9f28-805e482dafd4}
{17cd9488-1228-4b2f-88ce-4298e93e0966}
{1D2680C9-0E2A-469d-B787-065558BC7D43}
{1FA9085F-25A2-489B-85D4-86326EEDCD87}
{208D2C60-3AEA-1069-A2D7-08002B30309D}
{20D04FE0-3AEA-1069-A2D8-08002B30309D}
{2227A280-3AEA-1069-A2DE-08002B30309D}
{241D7C96-F8BF-4F85-B01F-E2B043341A4B}
{4026492F-2F69-46B8-B9BF-5654FC07E423}
{62D8ED13-C9D0-4CE8-A914-47DD628FB1B0}
{78F3955E-3B90-4184-BD14-5397C15F1EFC}
BYPASS TRIAL PERIOD EXPIRATION OF SOFTWARE
When softwares are installed for the first time, they make an entry into the Windows Registry with the details such as Installed Date and Time, installed path etc. After installation every time you run the software, it compares the current system date and time with the installed date and time. So, with this it can make out whether the trial period is expired or not.
So with this being the case, just manually changing the system date to an earlier date will not solve the problem. For this purpose there is a small Tool known as RunAsDate.
RunAsDate is a small utility that allows you to run a program in the date and time that you specify. This utility doesn’t change the current system date, but it only injects the date/time that you specify into the desired application.
RunAsDate intercepts the kernel API calls that returns the current date and time (GetSystemTime, GetLocalTime, GetSystemTimeAsFileTime), and replaces the current date/time with the date/time that you specify. It works with Windows 2000, XP, 2003, Vista and 7. It works with 32 bit and 64 bit versions.
To Run your Software Forever follow these Steps Carefully
You have to follow these tips carefully to successfully hack a software and make it run in it’s trial mode forever.
1. Note down the date and time, when you install the software for the first time.
2. Once the trial period expires, you must always run the software using RunAsDate.
3. After the trial period is expired, do not run the software(program) directly. If you run the software directly even once, this hack may no longer work.
4. To avoid any chances of runnung the software program directly, you can delete its shortcut from the desktop and create a new shortcut using runasdate and place it on the desktop.
5. It is better and safe to inject the date of the last day in the trial period.
For example, if the trial period expires on jan 30 2010, always inject the date as jan 29 2010 in the RunAsDate.
Note:
This software won’t work with Anti virus as they run in Background.
Download: RunAsDate Read more!
HOW TO INSTALL ANY LINUX ON USB
There is a tool, UNetbootin, that makes installing Linux on a USB drive simple.
UNetbootin can be used on either Linux or Windows.
Using UNebootin with Windows-
1. Download UNetBootin for Windows.
2. Download your favorite Linux ISO (Don’t ask me from where just Google it).
3. Now Start the Unetbootin.
4. Click the Disk Image radio box and browse to select Linux ISO.
5. Now set your target USB drive and click OK to start the creation UNetbootin Live USB Creation from an ISO.
6. Once the UNetbootin installer has completed, click Reboot. Now UNetbootin installation is finished.
7. Set your system BIOS or boot menu to boot from the USB device and enjoy your favorite Live Linux on USB.
Using UNetbootin with Linux-
1. The first thing to do is download a copy of UNetbootin. For our purposes we’ll download the Linux universal install binary (named unetbootin-linux-299). Once that has finished you will need to issue the Following command in order to make the file executable.
chmod u+x unetbootin-linux29
2. Once the file is executable issue the following command (from the same directory unetbootin-linx-299 is stored) to see the application running.
su ./unetbootin-linux-299
3. But you’re not ready just yet. Depending upon your distribution, you might come across an error involving p7zip-full. This might be in your distribution’s repositories. If you use Mandriva you can install p7zip but you will not have the full package. If you use Ubuntu you can get p7zip-full with the following command
apt-get install p7zip-full
4. Before you run the application you will need to insert and mount your usb drive. Stick in your usb drive and then issue the following command to find out where your usb drive is located.
dmesg
5. Mount that and then issue the following command. When you issue the command you will see the UNetbootin window.
su ./unetbootin-linux-299
6. Once this window is up and running you are almost there. If you have very specific needs for your distribution you will most likely have an image file downloaded to use. If you do not you can select your distribution from the drop down list. First you select the distribution and then you select the version (or release). Note: Unless you have a very large USB drive you will most likely want to use a netinstall version of your distribution. If you do happen to have a large USB drive you can go ahead with a full distribution. If this usb drive is for rescue purposes, or just to have a version of Linux with you at all times, a distribution like PCLinuxOS Minime is a greate choice.
7. Once the process is done you will have two buttons to click, Reboot and Exit. Don’t bother with the Reboot button. Click the Exit button and UNetbootin will close. You can now unmount your drive and reboot your machine to see if the installation works.Note: When your machine boots you will need to make sure it first boots from the USB device.
Note:
Not all USB installations will work on all machines. This can be an issue with your BIOS or your USB drive. If you install an OS that doesn’t work, try another. But after all that work, you might wind up with a machine that simply won’t boot from a USB drive. You have been warned.
Download:
UNetbootin
Read more!
Subscribe to:
Posts (Atom)